.png?height=120&name=Ayoa%20small%20(1).png)
When you add people to your Mind Map you can control how they interact with the content. You can make these choices when first creating the Mind Map, and you can update them at any time in the settings.
The options are:
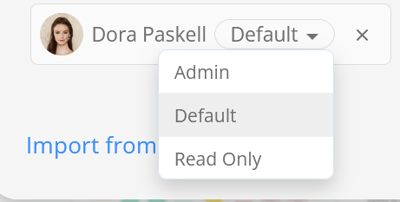
Admin - These users can make any changes to the Mind Map, as well as rename the Mind Map and invite and remove others.
Default - By default a user can edit and create branches. You can change the default settings so that default users cannot delete other people's branches and cannot invite other users to the Mind Map.
Read-Only - The user will be able to view the Mind Map but cannot make any edits to the Mind Map.
Setting Permissions when Creating a New Mind Map
First, invite people to the new Mind Map under Advanced Options.

You can then choose the level of permission for each user using the drop-down menu next to the user's name.
Changing the Permissions in an Existing Mind Map.
Click Share on the main toolbar within the Mind Map.

This will open a list of everyone in that Mind Map and their current permissions.

You can modify the permissions for each individual user by clicking on the drop-down.

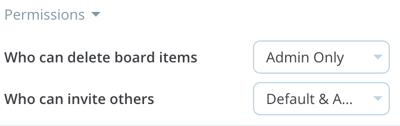
Click on Permissions to view more options.
There you can further control the permissions of default users by changing who can invite others to the mind map and who can delete components created by other users.