-1.svg)
The perfect way to give your maps a visual boost or to get down ideas first and organise them later
Adding floating text
1. To insert Floating Text onto your canvas, right-click on a space on the canvas to bring up a context menu. Then click on Add and choose the Floating Text option.

2. You will see the box where the text can be added, and with the format window, you can select font style, size, colour and add a frame.

3. You can change the position of the text by grabbing and moving it across the canvas. To change the angle, simply grab the green arrow and move the left or right.
4. To edit the floating text, just double-click on the text to bring back the format window.
Adding floating images
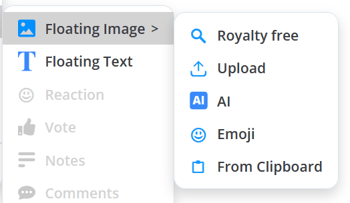
1. To insert Floating image onto your canvas, right-click on a space on the canvas to bring up a context menu. Then click on Add and choose the Floating image option.

2. Under Floating Image, you will see multiple options for adding images. You can upload the image from your computer, use the AI assistant, choose emoji, and select an image from Unsplash or an image saved in the clipboard.
3. Use the dots at the corners of the image to make it bigger or smaller. To change the position of the image simply grab and move it across the canvas. To change the angle, grab the green arrow and move the left or right.